I've decided to describe all the stuff in the first post in detail.
1. Flyback Transformer -- It started when I found this HUGE TV on the side of the road, ready to be demolished by the evils of unenvironmental people in orange jackets. I brought it home (with the assistance of an innocent bystander) and found that it actually was in working order. O_o. But because my family had no use and no room for it, I was given the OK to take it apart. And of course, before taking apart huge things that emit radiation, I looked online for things to target and not to target. I found the flyback transformer as one of them. I desoldered it and started searching for drivers. I think I still have the circuit board for the TV.
a. Single-Transistor Driven -- The first driver I used was the basic single-transistor driver. The only thing I had to buy was the transistor. I salvaged everything else. The driver worked well, 2 cm arcs. Estimated 15-30 kV.
b. CFL-driven -- I was looking around on Instructables.com when I found a new driver that was alleged to work. So I took apart a 13 watt CFL (compact fluorescent light -- those light bulbs that are all spirally and twisty) and hooked it up. It works. Same results as the single transistor.
2. Numerous Takeaparts -- I'll list as many as I can think of. Hard drives, cameras (digital and disposable), TV, computer monitors, numerous computers, laptops, CD drive, floppy drive, computer PSU, iPods, carbon monoxide alarm, solar powered calculator,...That's all I can think of at the moment. I'm sure there's more.
3. Volume-Reduction of a Flat-Screen LCD -- I took apart a flat-screen LCD that still worked well but was being disposed of because it wasn't being used. So I took it apart (the casing was HUGE) and built a cardboard enclosure that reduced the thickness by more that 30%.
4. Hard-Drive Takeaparts -- I've obtained numerous hard drives over the years (at first for the magnets inside). Now, I've got a 20 GB, 400 GB (bought), and two 30 GB (one dead). Others were here before but are no longer with us.
5. Butane-Fueled Gun -- A film canister with an aluminum tube sticking out the cap. I consider it a failure because it failed to produce the thrust necessary to shoot something. Sparks were made by piezoelectric igniters from lighters.
6. HHO Torch -- See posts for more info.
7. LED destruction -- Purely a for-fun project. Attach a electric bug racket to an LED. Watch out for shrapnel. 'Nuff said.
8. Capacitor Banks -- Using flash capacitors from disposable cameras, I've made a 5-cap bank. Because it pulse-discharges at 300 volts, it is considerably powerful enough to blast craters in pennies and vaporize large circles of aluminum. And vaporize thin wires completely.
9. Setting Random Things on Fire -- This is self-explanatory.
10. Match Rockets -- Very fun thing to do. I've made double and triple matchhead models but had them blow up in mid-air.
I'll post more later. This is not all that I've done. This is just the beginning.
Friday, October 24, 2008
New Cell Layout
Building on the last post's electrode plans, after extensive testing, I'm going to make a "cell" out of the carbon electrodes. Each row of electrodes will be joined together by a soldered wire, and there will be several rows, alternating between (-) and (+).
I'm still looking for a new bootleg flashback arrestor...the last one made from a medicine pill bottle had unforeseen leaks.
Also, during the long hiatus, I had beefed up the capacitor bank charger/discharger. Now it blows half-centimeter diameter holes in aluminum foil and blasts little craters (deep enough to see zinc) in pennies. I may or may not post pictures of those.
I know how confusing this is, so pics in a few!
Thursday, October 23, 2008
Choice of Electrodes
Sorry for the long hiatus. School started.
I've chosen carbon rods for my electrodes. This is because they don't contaminate the water and remain conductive.
To keep the surface-volume ratio high, I've chosen sticks of .5 mm pencil lead. They will be "soldered" onto a thin aluminum wire (they aren't actually soldered, they reject being soldered, but it maintains a better electrical connection and holds the sticks in place). Pictures and results later!
Sunday, August 24, 2008
New Plans
Plannin' on replacing the electrodes with a whole cell, made out of either aluminum mesh (yeah, right....they'll disappear into powder) or razor blades. This cell will feature neutral plates, which should boost the gas output.
Saturday, August 23, 2008
v3.1 Completed and Tested
HHO Torch v3.1 was completed and tested. The electrolytic cell is made from an apple juice bottle with gold (plated?) electrodes from IC sockets. The cell works fine and is leak-free, but the new flashback arrestor made from a prescription med pill bottle appears to have a leak. Due to this leak, no flame was produced...yet. Gas output was much better with the new electrodes, and surprisingly did not vary with changing current. The gold electrodes on the anode somehow got black residue on them but was replaced as the residue was difficult to remove. More research found the 923 Hz frequency and Stan Meyer's research to be of questionable integrity. Photos soon.
Sunday, August 10, 2008
Version 3 completed. It consists of an plastic bottle with a more airtight screw-on cap connected to a pill bottle (flashback arrestor) with a 120v power cord insulation tube. Just finished testing it and determined that oxyhydrogen output is way too low. Researching on how to produce 923 Hz electric outputs for higher production efficiency. Pictures soon.
Tuesday, July 29, 2008
Pictures of HHO Torches v.1 and v.2
PICTURES!!!

HHO Torch Electrolysis Cell v.1.0 (yes, it is a Chinese fish powder container. So what. Sue me. I like my stuff free. Not one of my projects (except a transistor for the flyback driver) has cost me a single cent so far.)
 Ugh. Look at the corrosion on these electrodes.
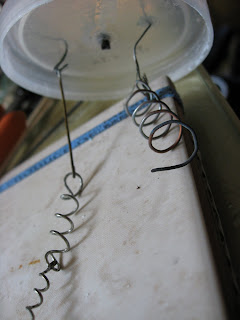 Another shot of the fake aluminum electrodes (they were aluminum plated copper (?what's the use of that?))
 Behold! It is v.2.0!
With flashback arrestor (little vial thingy). It prevents the cell itself from exploding in the event that the hydrogen flame burns back through the tube into the system.
 A closer shot of the flashback arrestor. The gas comes through the white wire insulation (no wires in it) and bubbles through water (to remove particles). The water also acts as a flashback arrestor in the event of an explosion. The water stops the explosion from reaching the cell via tube.

More corroded electrodes. But these are actually real aluminum.

HHO Torch Electrolysis Cell v.1.0 (yes, it is a Chinese fish powder container. So what. Sue me. I like my stuff free. Not one of my projects (except a transistor for the flyback driver) has cost me a single cent so far.)
 Ugh. Look at the corrosion on these electrodes.
 Another shot of the fake aluminum electrodes (they were aluminum plated copper (?what's the use of that?))
 Behold! It is v.2.0!
With flashback arrestor (little vial thingy). It prevents the cell itself from exploding in the event that the hydrogen flame burns back through the tube into the system.
 A closer shot of the flashback arrestor. The gas comes through the white wire insulation (no wires in it) and bubbles through water (to remove particles). The water also acts as a flashback arrestor in the event of an explosion. The water stops the explosion from reaching the cell via tube.
More corroded electrodes. But these are actually real aluminum.
I will soon use some vinegar as an electrolyte, and not baking soda as baking soda creates this disgusting carbonate precipitate (Al(CO3)3?) that turns the water blue and creates this white stuff that settles as well as black specks. Interesting, but not wanted. And the Snapple cap is well sealed, but still is leaking. So I'm scratching the Snapple design in favor of something with a little more "screw" to the cap. Updates soon.
Monday, July 28, 2008
v.2.3 Scratched
HHO Torch version 2.3 has been scratched due to a mysterious "leak" that cannot be identified. Version 3 is currently in the design phase. Photos of the failed version 2 family will be posted.
P.S.: Version 2.3 actually worked for a bit....until I switched electrodes from carbon rods to aluminum coils. I'm never using aluminum again. It decomposes into this black flaky stuff that falls to the bottom of the solution. Rate of production for carbon rods were slow, which was why I switched.
P.S.: Version 2.3 actually worked for a bit....until I switched electrodes from carbon rods to aluminum coils. I'm never using aluminum again. It decomposes into this black flaky stuff that falls to the bottom of the solution. Rate of production for carbon rods were slow, which was why I switched.
Friday, July 25, 2008
Hello!
Hi! My name is Phil Chang, from New Jersey.
I like to experiment with anything moderately challenging or dangerous. Here are some of my projects so far (that I won't give a full description of):
1. Flyback Transformer
a. Single-Transistor Driven
b. CFL-driven
2. Numerous takeaparts (too many to mention)
3. Volume-Reduction of Flat-Screen LCD for use with laptop
4. Salvaging of Hard Drives and RAM from old computers for use (so far a live 80 GB, 20 GB, 18 GB hard drives salvaged; about 3-5 others already taken apart)
5. Butane-fueled gun
6. Electrolytic Cell v.1.0. for HHO torch.
7. Blowing up LED's (yes, they explode) with high voltage
8. Vaporizing strips of metal using photoflash capacitors (and getting shocked thrice)
9. Setting random things on fire and seeing what happens.
10. Match rockets.
And my current project....the HHO torch. It uses electrolysis of water to produce H2 gas and O2 gas (called HHO gas). It uses baking soda as an electrolytes. It then combines the gases at the torch tip, all in real time. Nearing completion of v.2.3. Version 1 was a glass container with a plastic snap-on lid with aluminum wire electrodes and wire insulation tubing. (Yes, I like things free.) Version 2.0 was developed to address the problem of gas leakage through the snap-on lid.
Version 2.0 was a Snapple bottle with holes in the cap for wire insulation tubing and electrodes. Version 2.0 was a success, creating good amounts of gas at reasonable pressures, but developed an unidentified leak (still not identified!). Version 2.1 was simply a cap replacement. That soon failed due to an oversized hole for the insulation tubing. Same with version 2.2. As of now, the cap for Version 2.3 has been fitted and the glue to seal the cap is drying. Pictures soon.
Subscribe to:
Posts (Atom)